Creating My Own Static Site Generator
Introduction
I decided to take a break from game development and focus on my personal website.
Having no professional experience in website creation or management, my previous attempts included:
- Initially using Hugo
- Building a React SSG with
vite-ssr, generating pages as if it were a SPA (Single Page Application) - Experimenting with 11ty/eleventy
While these solutions worked well and offered flexibility, I wanted to learn by building dependencies-free solutions. As someone who prefers game development over frontend work, I found existing tools distracting. Thus, I decided to rebuild my website from scratch... again.
Getting Started
My website requirements:
- Simple HTML pages without JavaScript when possible
- Markdown support for content creation
- Code syntax highlighting
- Dark/light theme toggle
- Mobile-friendly responsive design
- Bilingual support (English/Russian)
- Fast generation speed
- Quick page loading
- Beautiful emoji rendering
- Self-contained assets (no third-party embeds)
- SVG icons
- Social media links
- sitemap.xml
- Static files (robots.txt, ads.txt, verification files, HTML5 game prototypes)
- Site search functionality
- Atom/RSS feed (questionable necessity)
New Hosting Solution
Migrated from Firebase Hosting to Cloudflare Pages. Added simple redirect rules in Firebase to point to the new site, as changing the domain address entirely would be impractical for some time. As a result, the old site eliasku-games.web.app now redirects to the main page of the current version at eliasku.win. Finally purchased a short domain for the site, which was easily configured through Cloudflare’s dashboard—they even offer domain purchases directly in the admin panel and allow creating custom email addresses for the domain. All HTTPS certificates work out of the box.
Whatever choices I make now, I’m confident that all content and the site generator remain safely stored in my repositories and backups.
Consider using Netlify as well. To avoid cluttering the main site, you can host HTML5 game demos and prototypes on Netlify. Each draft or prototype stays in its own repository with a readable public domain, and their build/deploy automation works seamlessly—even for private repositories (free of charge).
Generator Architecture
The project consists of two main parts:
- Generator and build scripts.
- Content sources, static assets, and templates.
Code and Scripts
The project is structured as a private npm package. The codebase uses TypeScript executed via Node.js with TSX. This setup works perfectly for script execution (for my current needs).
To work on the website, I simply run npm start to develop content and even modify the generator’s code directly!
For full site generation and deployment, only two commands are needed:
npm run build
npx wrangler pages deploy ./dist --project-name ....
Next, I’ll outline the major functional components of the project.
Local Development Server (dev-server)
Having a local development server is incredibly useful for quickly previewing your generator's output – essentially seeing your final site in real-time. The server automatically monitors your content folders and generator code, restarting the build process whenever changes occur. To observe live updates even when modifying the generator's core logic, I launch the build script as a separate process each time, ensuring clear separation between the generation utility and the server itself.
For future improvements, I'd like to implement automatic page reloading when changes are detected. This could be easily achieved by injecting a small script into every generated page that listens to an Event Stream, receives update notifications, and triggers a page refresh.
Read my story about creating the dev-server from scratch here
Static Site Generator
The generator is the code that generates and outputs the site into the dist/ folder, which can then be deployed to your configured CDN.
Asset Processing
Conversion and compression of images or any other resources requiring intermediate processing. Here, we generate a resource path mapping to connect image references in content with their final build locations. Some files and folders are copied "as is" without creating mappings.
Image Processing and Hash Sum
For image processing, I use the sharp library:
- Compress to
webpwith lossy quality (currently without size restrictions). - Generate content-based hashes, generate filenames, and save them to the
public/a/directory. - Add mappings to the path map (e.g.,
/games/duckstazy/duckstazy-1.pngbecomes/a/4uvxTHwp.webp). - Update links during generation using the path map.
Content
My content mainly consists of pages for my old games, some drafts, and articles. I migrated everything "as is," though I had to make minor adjustments and improvements here and there.
Templates
Why templates? Our goal is to output HTML code, which we could achieve through string concatenation. However, it’s more convenient to write standard HTML and insert dynamic content in specific places (hello, PHP).
For templates, I chose the Eta library: dependency-free, TypeScript support, and minimalistic functionality. I liked its familiar feel and conceptual similarity to template systems used in static site generators (hierarchy and partial template inclusion).
Metadata
Front-matter for metadata seems to be a standard. Initially unsure about its convenience, I wanted to use existing solutions regardless.
Markdown Files
For Markdown rendering (converting .md to HTML), I tried Marked (has plugins, TypeScript types, and appears more popular than markdown-it, with verified support for anchors, syntax, and links).
Ended up implementing Table of Contents with regex, anchors similarly, and injected image links and other shortcuts via a custom Renderer. While it feels somewhat limited, extending it proved manageable once I adapted.
Syntax Highlighting
Wanted to use PrismJS, but it didn’t seem compatible with marked — or I just couldn’t figure it out. Settled for the popular Highlight.js, changing themes (plenty available by searching for theme-specific CSS). Example: Catppuccin theme.
Localization
Folder Structure
I needed to determine the optimal structure. While most guides recommend mirroring the website's URL paths in the file system, I developed a different approach.
For localization, I implemented the following URL strategy:
https://eliasku.win/blog/for English (default language)https://eliasku.win/ru/blog/for Russian (language code prefix)
The conventional recommended structure looks like this:
./ru/blog/post1/index.md
./ru/blog/post2/index.md
./en/blog/post1/index.md
./en/blog/post2/index.md
This proved impractical. Not only does it force image duplication between language versions, but verifying content completeness becomes cumbersome—you need to navigate deep into nested folders to check if a Russian translation exists.
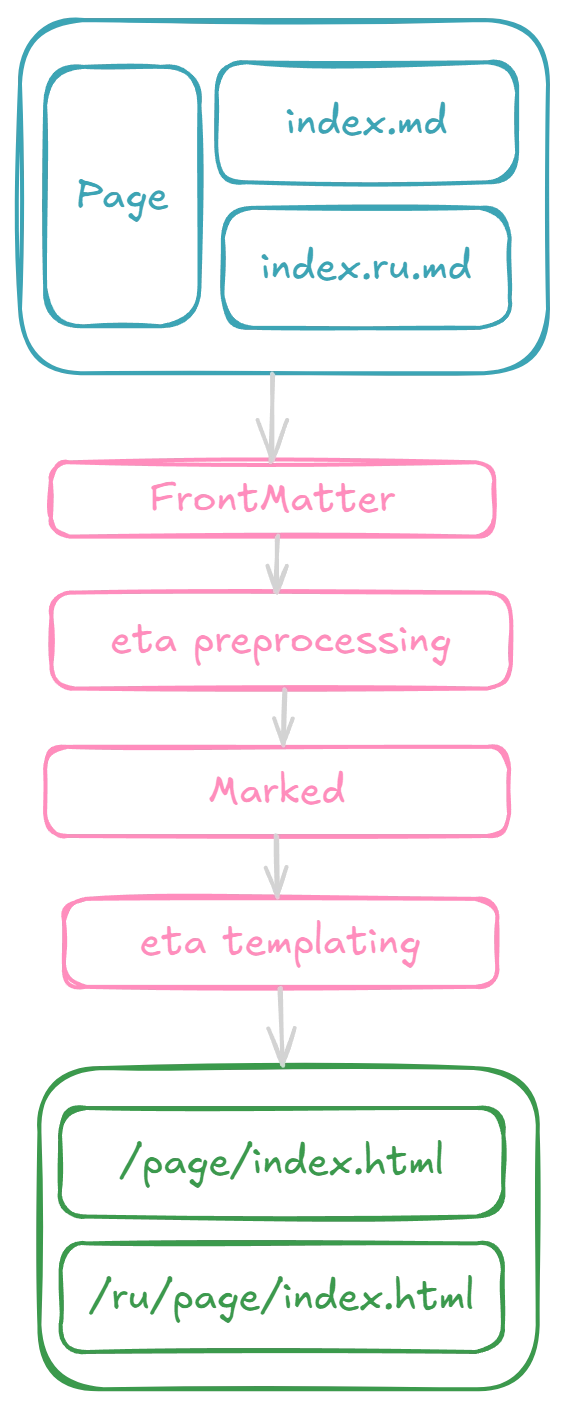
Instead, I adopted an entity-centric approach where each article/game contains all its translations and assets within a single folder. Conceptually:
- Create an Article/Game entity
- Store all language versions and related images within its folder
- Treat each translation as a variant of the same page
The final structure:
./blog/post1/index.md       # English version
./blog/post1/index.ru.md    # Russian version
./blog/post2/index.md
./blog/post2/index.ru.md
Date & Time Handling
For date localization and formatting, I chose Luxon. While it supports localized date displays (e.g., month names), note that TypeScript type definitions aren't included in the base package.
Example implementation:
DateTime.fromJSDate(date, { zone: "utc" }).setLocale("ru").toFormat("dd LLLL yyyy");
Translation Dictionary
Templates and pages can share translations through a centralized dictionary rather than maintaining separate language versions. The localization object structure:
export const loc = {
  en: {
    copyright: "Copyright",
    // ...
  },
  ru: {
    copyright: "Авторские права",
    // ...
  },
};
Template implementation: <%~ it.loc.copyright %>
Issues with Previously Created Articles
Originally wrote a postmortem for Game 13 on Hashnode, then migrated the article to my site. The article contained Twitter embeds (for videos), but Twitter doesn’t allow easy downloading of your own videos from their platform. I had to use "well-known methods" to extract the videos, host them on my site, and REMOVE that clunky Twitter embed script!
Dzen also caused migration headaches.
Conclusion: Popular, closed platforms make it hard to export your content properly—you’ll inevitably need to adjust formatting or rework parts. Remember: your content belongs to you. These platforms exploit your work on their "convenient" services. While some creators monetize content tailored for such platforms, others risk wasting effort on fleeting solutions.
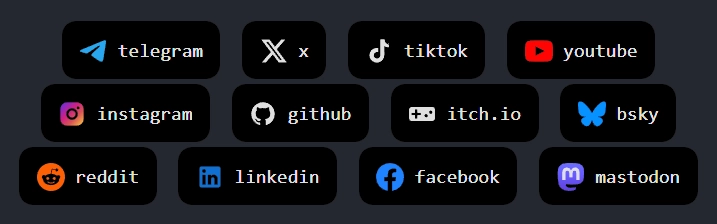
Social Media Links to Stay Connected
I opted for raw <svg> code for social icons instead of FontAwesome. Surprisingly, this was simpler! Added links to Bluesky, Mastodon, and Telegram, tweaked colors for brand recognition, and included text labels since visual distinction matters with many links.
Other Interesting Bits
URLs and Cyrillic Text
Generating anchor links for the Table of Contents required transliterating Russian headings into Latin characters. The same approach could apply to page URLs. While built for Russian, this utility can be extended to other languages later.
sitemap.xml
The simplest part: generate a proper sitemap.xml using your page list and configurations. Plenty of guides exist, so I reused an old template. Key tip: allow excluding pages like 404.html or draft articles shared prematurely  for feedback.
Cursor and AI Assistants
During rewrites, I switched to Cursor with claude-3.5 support. While the AI couldn’t build exactly what I needed via prompts alone (resulting code would’ve been bloated with unnecessary features), it helped with specific tasks like anchor generation. The key is keeping code simple and linear—AI works best for modular, well-defined functions.
Lighthouse Test
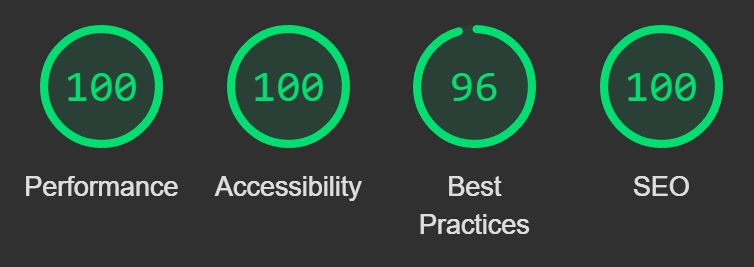
Scores aren’t perfect due to Cloudflare’s injected scripts:
- Email obfuscation (TTL: 1 hour)
- RUM analytics (logs errors to console, slightly lowering scores)
I’ll keep them enabled for now—results are still solid.
Conclusion
Made it to the end? You’ve earned an achievement! 
Questions or topics to explore further? Let me know via social media or email!
 Comments aren’t implemented yet—feel free to reach out!
 Follow on socials for updates on new articles and games.
Try building your own SSG—and share your journey!